
Email communication is an essential part of our daily workflow. However, spam emails often disrupt productivity and pose security risks. The “Check Email and Log” plugin offers a robust Spam Analyzer option to identify and mitigate potential spam issues. This feature helps maintain a clean and efficient email environment by analyzing outgoing and incoming emails to ensure compliance with email best practices.
How the Spam Analyzer Works.
The Spam Analyzer in the “Check Email and Log” plugin evaluates your email content against established spam-checking algorithms. These algorithms assess various factors like:
- Content Quality: Checks for spammy words, overuse of caps, or misleading language.
- Email Headers: Ensures headers are correctly formatted and free from blacklisted sources.
- Attachments: Flags suspicious attachments that may trigger spam filters.
- SPF, DKIM, and DMARC Compliance: Verifies email authentication records to prevent spoofing.
- Reputation Score: Checks the sending domain or IP for its trustworthiness.
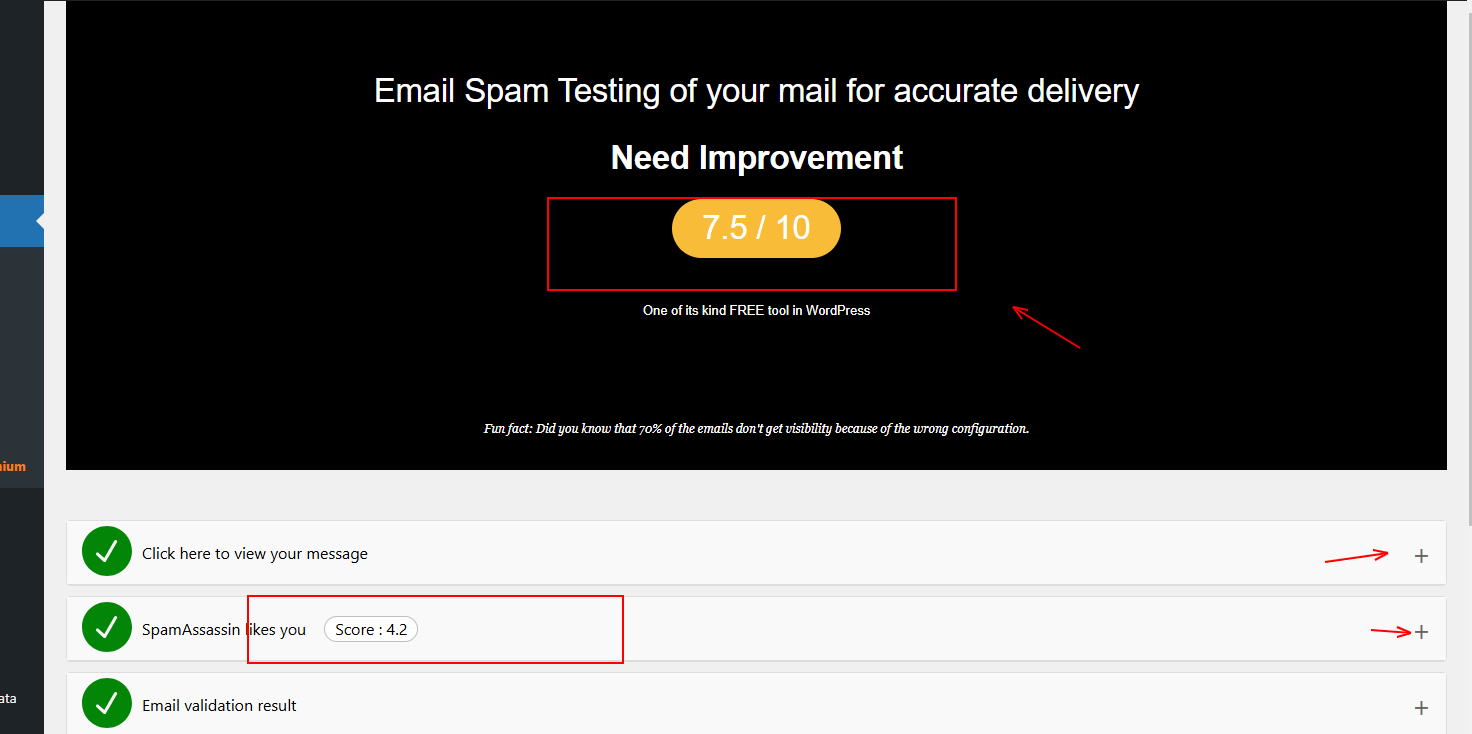
Each email is assigned a spam score. A higher score indicates a greater likelihood of the email being marked as spam.
In this tutorial, we’ll dive into the functionality of the Spam Analyzer, share tips on using it effectively, and answer some common questions.
- First, install the plugin from here https://wordpress.org/plugins/check-email/ or go to add the plugin and search for “Check & Log Email by checkmail“. Download the plugin and install it.

- Now, click on Spam Analyzer, and it will redirect you to a dashboard where you’ll find the option to check your email spam score. Click on that option, and it will provide a detailed report.
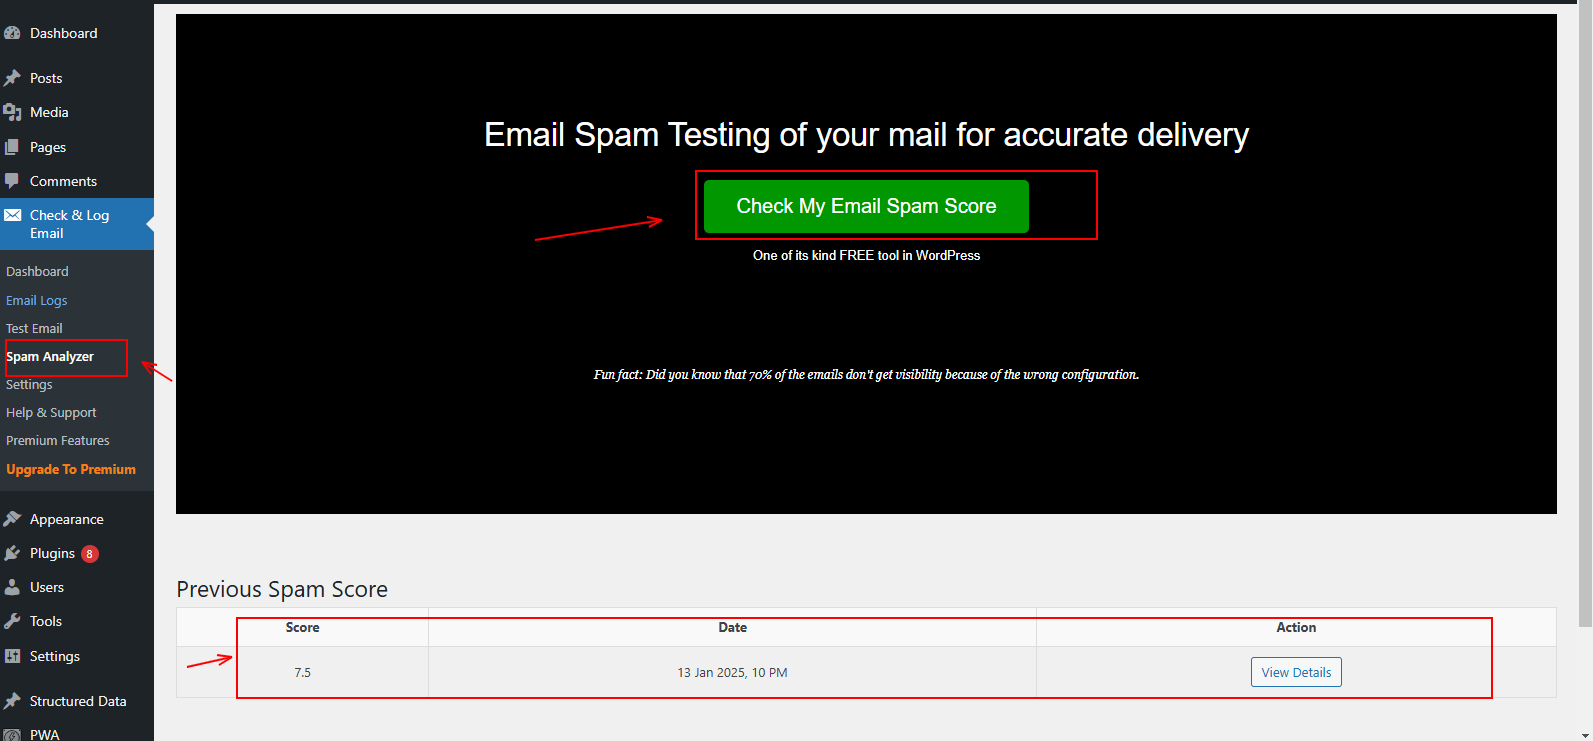
- Now, click on ‘View Details,’ and it will provide you with a complete report along with the scores.
- When you are not authorized properly, it will show a red cross along with some detailed points. Let’s see what that means.
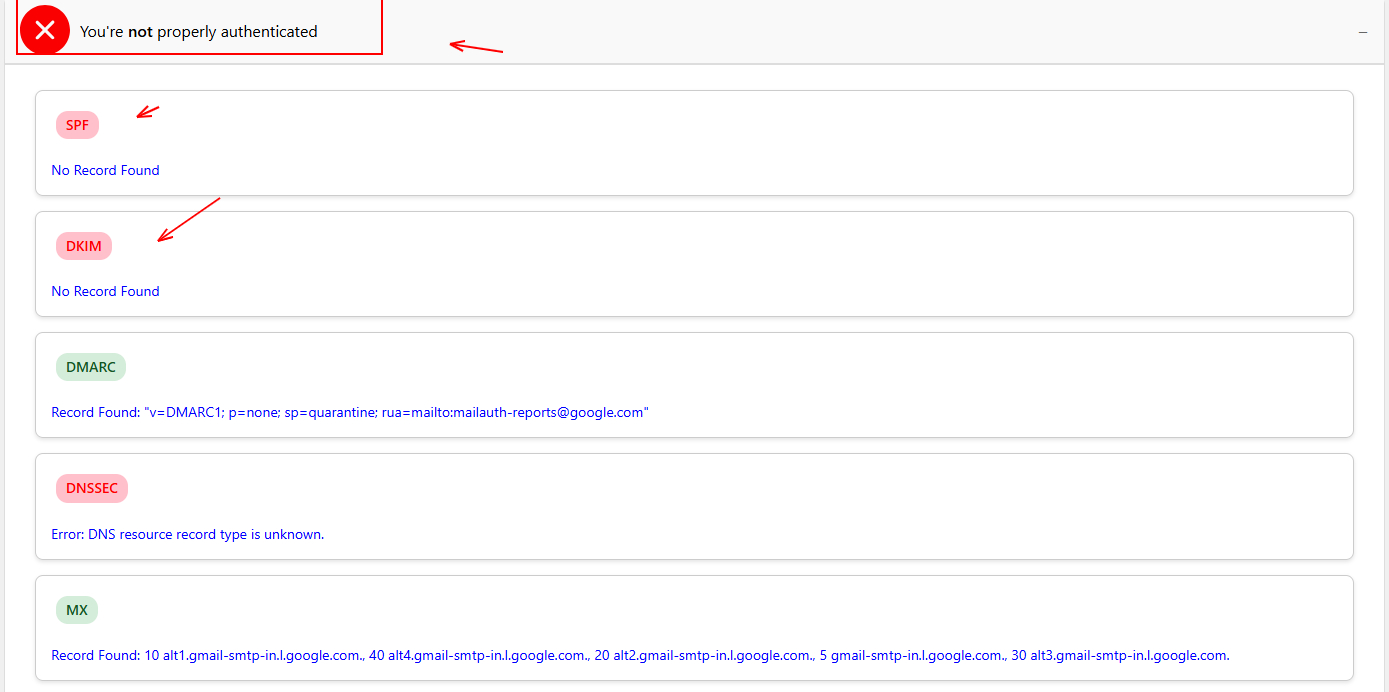
- Lets understand all the terms which is above mentioned.
SPF (Sender Policy Framework):
- SPF is a way to verify that an email is being sent from a legitimate source. It checks whether the sending server’s IP address is allowed to send emails on behalf of the domain. If the server is not listed in the SPF record, the email might be marked as spam.
DKIM (DomainKeys Identified Mail):
- DKIM adds a digital signature to emails, ensuring that the email content has not been altered in transit. It helps to verify the sender’s identity by checking the DKIM signature against the domain’s public key, which is stored in DNS records.
DNSSEC (Domain Name System Security Extensions):
- DNSSEC is a security protocol that protects the DNS system from certain types of attacks, such as cache poisoning. It adds cryptographic signatures to DNS data, ensuring that the data has not been tampered with and is from a trusted source.
MX (Mail Exchange):
- MX records are DNS entries that specify which mail servers are responsible for receiving emails for a particular domain. They ensure that emails are delivered to the correct server. A misconfigured MX record could result in email delivery failure.
CA (Certificate Authority):
- A Certificate Authority is an organization that issues digital certificates used to verify the identity of a website or server. For email, a CA ensures the authenticity of the connection between the email server and the recipient’s server by encrypting the communication, making sure it’s secure.
DMARC (Domain-based Message Authentication, Reporting & Conformance):
- DMARC is a policy that allows email senders to protect their domain from being used for email spoofing (faking the sender’s email address). It works with SPF and DKIM to verify that an email is legitimate. DMARC can also instruct receiving servers on what to do if an email fails the checks (e.g., reject it or send a report).
These checks help ensure that emails are coming from legitimate senders, are secure, and are less likely to be flagged as spam.
Best Practices for Using the Spam Analyzer.
- Authenticate Your Domain
- Set up SPF, DKIM, and DMARC records to ensure your emails pass authentication checks and enhance security. Use tools like Google Postmaster Tools to monitor your domain’s reputation and maintain good email deliverance.
- Maintain a Clean Email List.
- Regularly clean your email list by removing inactive or invalid addresses to maintain a healthy subscriber base. Implement double opt-ins to confirm that your subscribers genuinely want to receive your emails, ensuring better engagement and compliance.
- Monitor Spam Scores.
- Use the Spam Analyzer to test your emails before sending them, ensuring they meet deliverability standards. Address any flagged issues, such as poor formatting, lack of authentication, or blacklisted URLs, to prevent your emails from being marked as spam.
- Log and Review.
- Use the email logging feature to track and analyze your email performance. Regularly review the logs for patterns in spam issues, and take corrective action to improve deliverance and maintain a positive sender reputation.
FAQs About the Spam Analyzer Option.
- What is a good spam score?
: A score below 5 is generally considered safe. Higher scores indicate potential spam issues that need to be addressed.
- Can the Spam Analyzer prevent incoming spam emails?
: No, the Spam Analyzer primarily evaluates outgoing emails to ensure they are not flagged as spam. To filter incoming spam, consider configuring your email provider’s spam settings.
- Does the Spam Analyzer support multiple email clients?
: Yes, it works with all email clients that the “Check Email and Log” plugin supports, including SMTP services like Gmail, Outlook, and custom domains.
- How can I test my email before sending it to multiple recipients?
: Use the Test Email feature in the plugin. This allows you to send a sample email and view the spam score along with recommendations for improvement.