
In version 2.0.2, we’ve introduced Microsoft 365/Outlook SMTP support to the Check & Log Email plugin, enhancing email reliability and security for WordPress sites. With this update, users can now send emails directly through their Microsoft 365 or Outlook accounts, ensuring better deliverability for critical emails such as password resets and notifications. This guide provides a step-by-step setup process, along with best practices and a FAQ section to address common questions.
What is Microsoft 365/Outlook SMTP mailer?
Microsoft offers more than just email hosting, it provides a powerful solution to improve email delivery when using the Check & Log Email plugin. This solution utilizes an API (Application Programming Interface), which means you don’t have to enter your login details directly into your WordPress admin area. This enhances security compared to traditional SMTP methods, where sensitive information may be exposed.
The Microsoft/Outlook mailer is particularly efficient, capable of sending up to 1,000 emails per minute. This performance significantly exceeds the sending limits of most other email services, making it a reliable choice for users who need to send a large volume of emails quickly and securely.
Pricing: No cost.
Email Address Requirements: The free service is applicable only for Microsoft email addresses (e.g., alexa@outlook.com, alexa@live.com, and Office 365 emails associated with Exchange Online). Users of Exchange Server will need a paid Outlook (Office 365) account to utilize a domain-based email address for sending.
Microsoft’s API provides a secure and cost-free method for email delivery. However, setting it up can be more intricate compared to other mailing solutions available in the Check & Log Email plugin, and users may experience minor delays of up to a few minutes in email delivery times.
In this tutorial will walk you through setting up Microsoft 365/Outlook SMTP in the Check & Log Email plugin, with tips for best practices and an FAQ section to help with common issues.
- First, install the plugin from here https://wordpress.org/plugins/check-email/ or go to add the plugin and search for “Check & Log Email by checkmail“. Download the plugin and install it.

- Click on “Settings,” and it will redirect you to the plugin dashboard, where you will see various options. Click on “SMTP,” enable the “SMTP” option, and then click “Save.

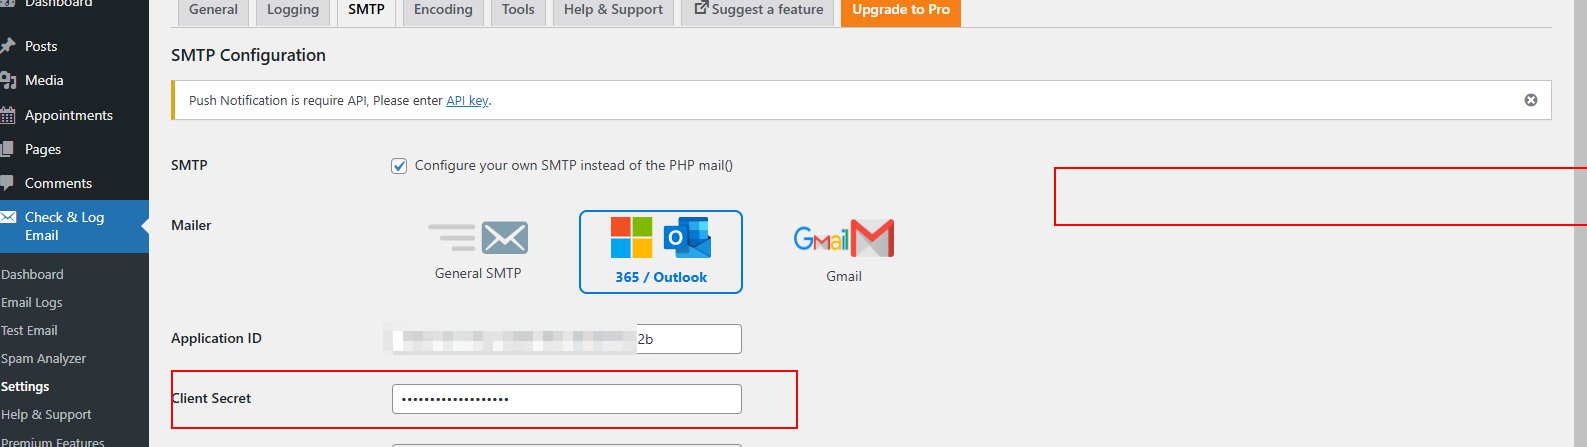
- Once you enable the option, you will see choices for “General SMTP” and “Microsoft 365/Outlook”.
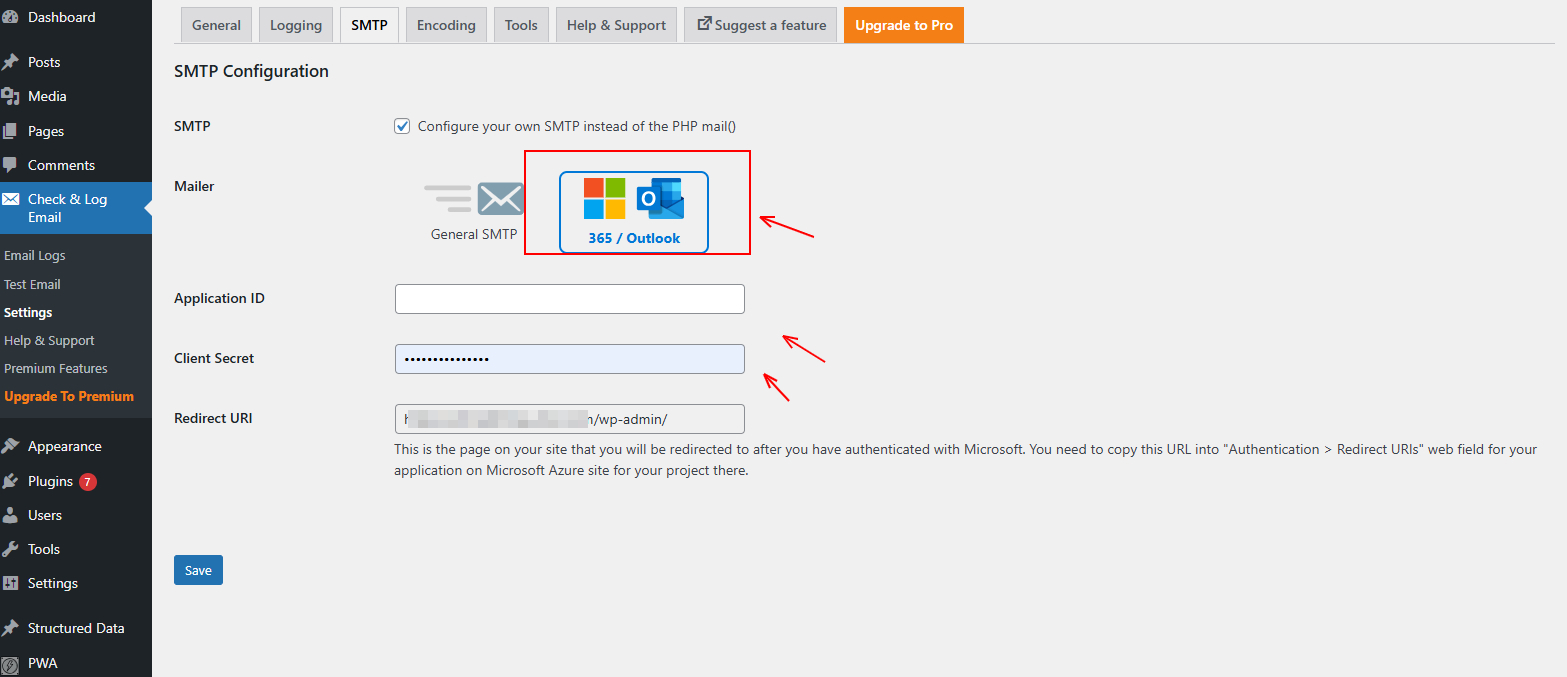
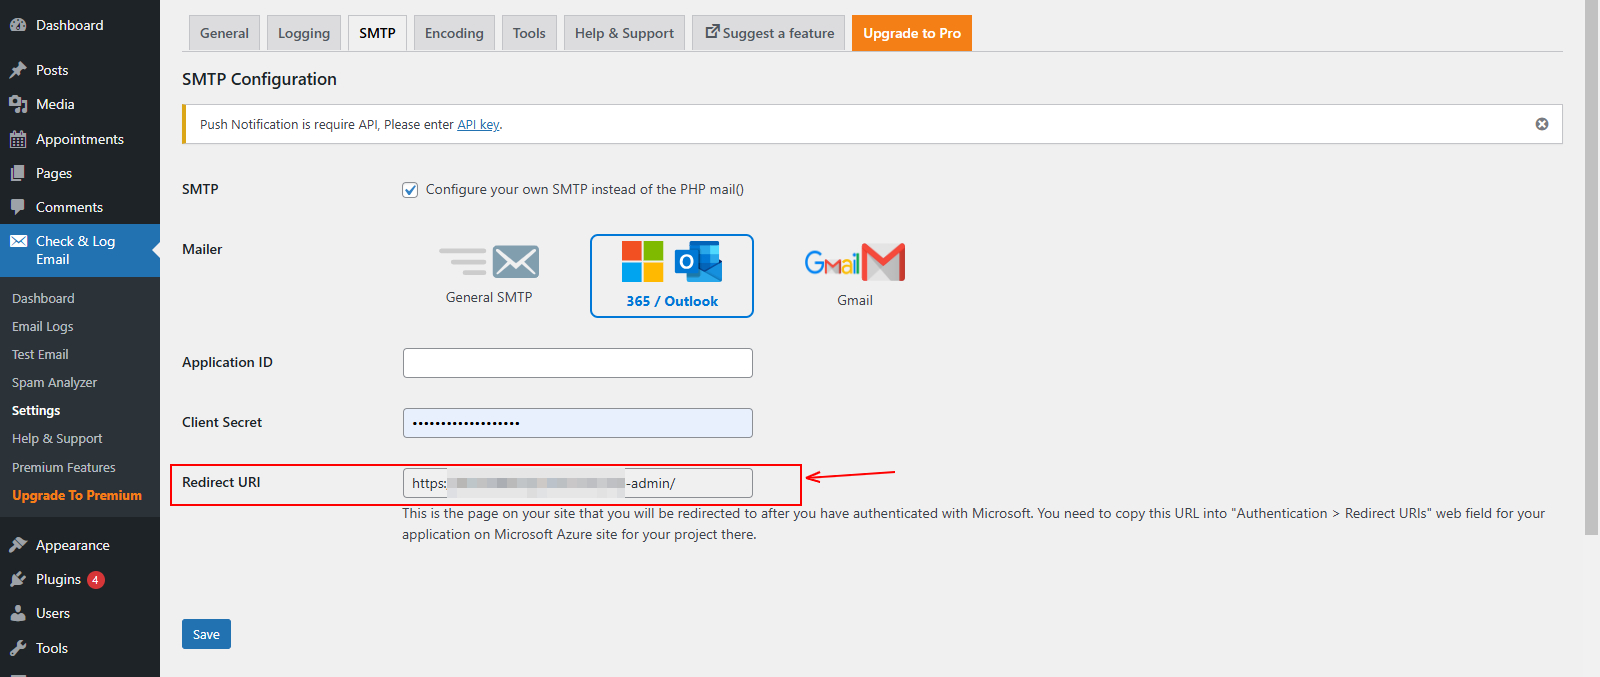
- Fill in all the sections: “Application ID,” “Client Secret,” and “Redirect URL.” You can find the Application ID in your Azure account. To access it, go to Microsoft Azure and log in with your credentials.
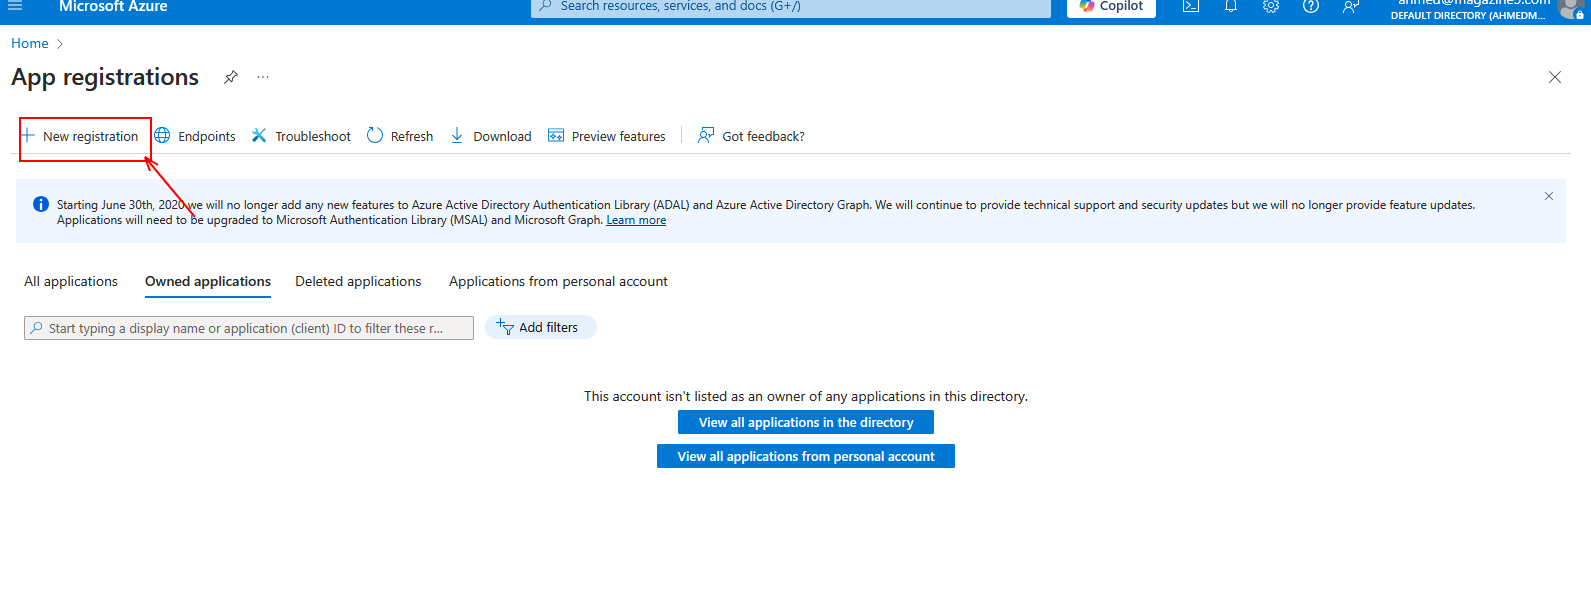
- After opening the Azure Portal, click on “App registrations” or type “App Registration” in the search bar at the top of the page.
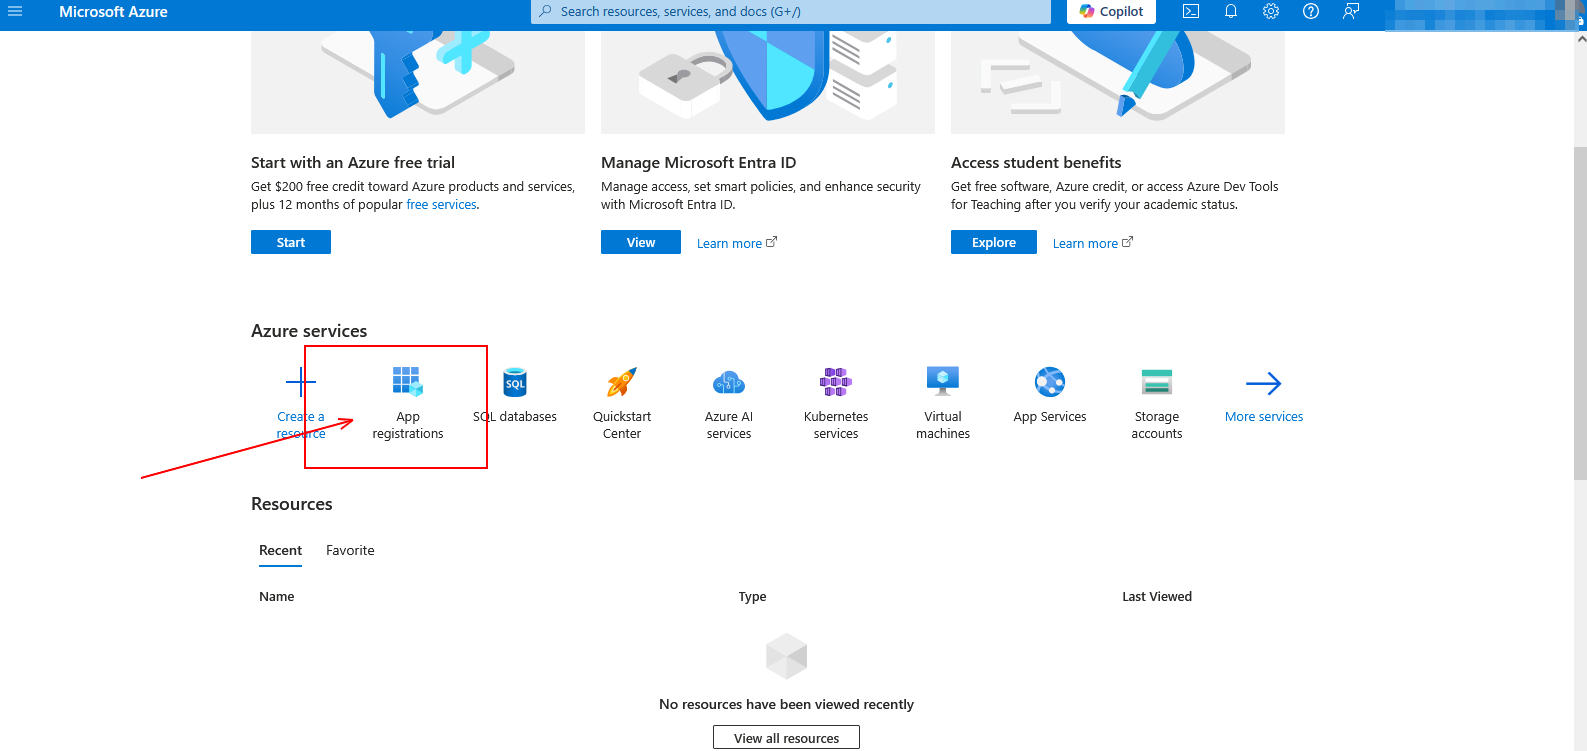
- Click on “App Registration,” and it will redirect you to a new page where you will see several options. At the top of the App Registrations page, click on “+ New Registration.”
- In the app registration form, you need to provide the following details:
- Name: This is for internal use within your organization. We recommend naming it something like “WP Mail SMTP: yourdomain.com”.
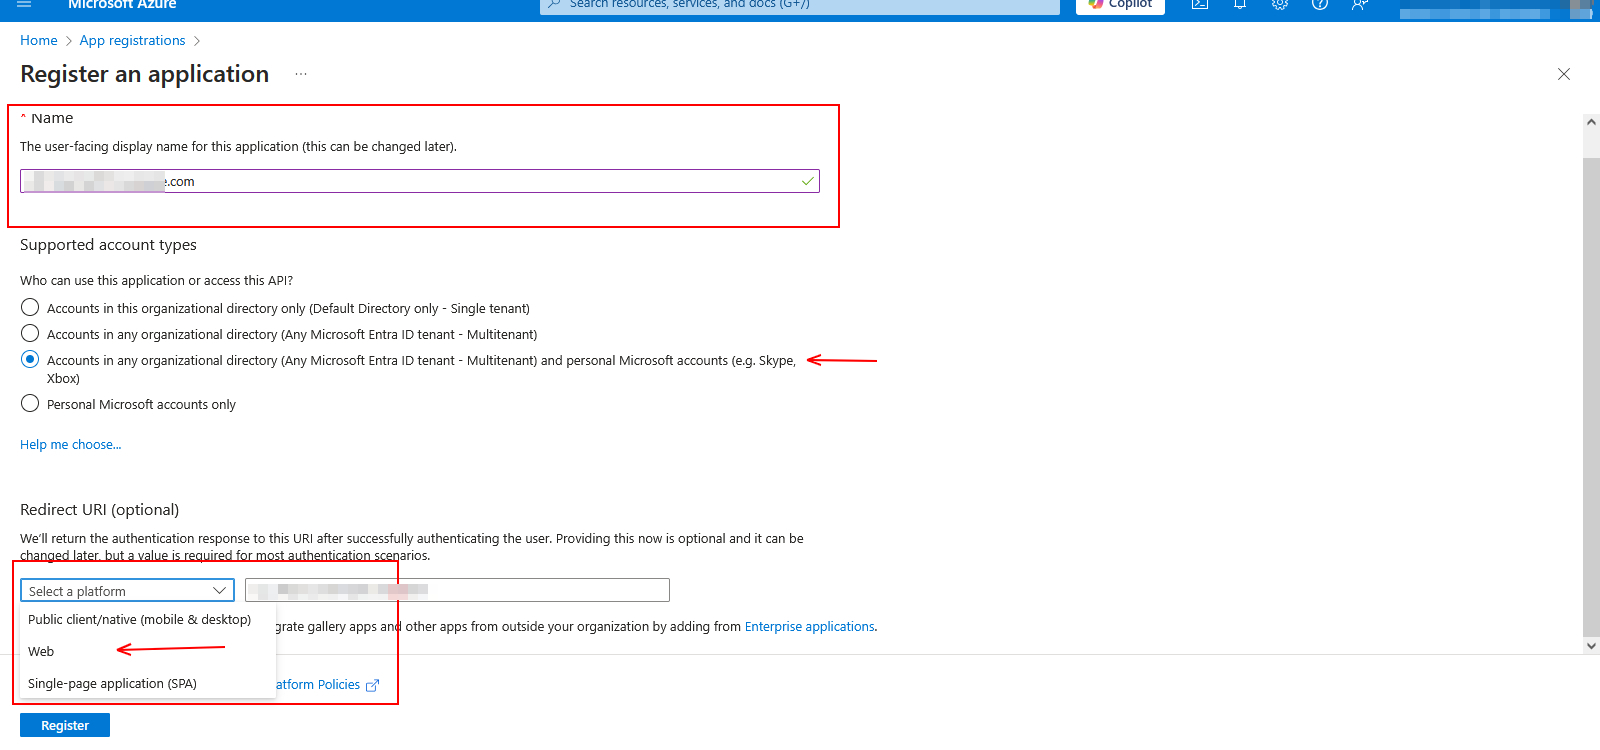
- Supported account types: Choose “Accounts in any organizational directory and personal Microsoft accounts.”
- Redirect URI:
- Leave the first dropdown set to Web.
- For the second field, copy the Redirect URI from your WP Mail SMTP settings.
- To find the Redirect URI, switch back to the tab or window where your WP Mail SMTP settings are open. Under the Outlook / 365 section, locate the Redirect URI field and copy its value.
- Once you’ve filled in the details, click the Register button to continue.
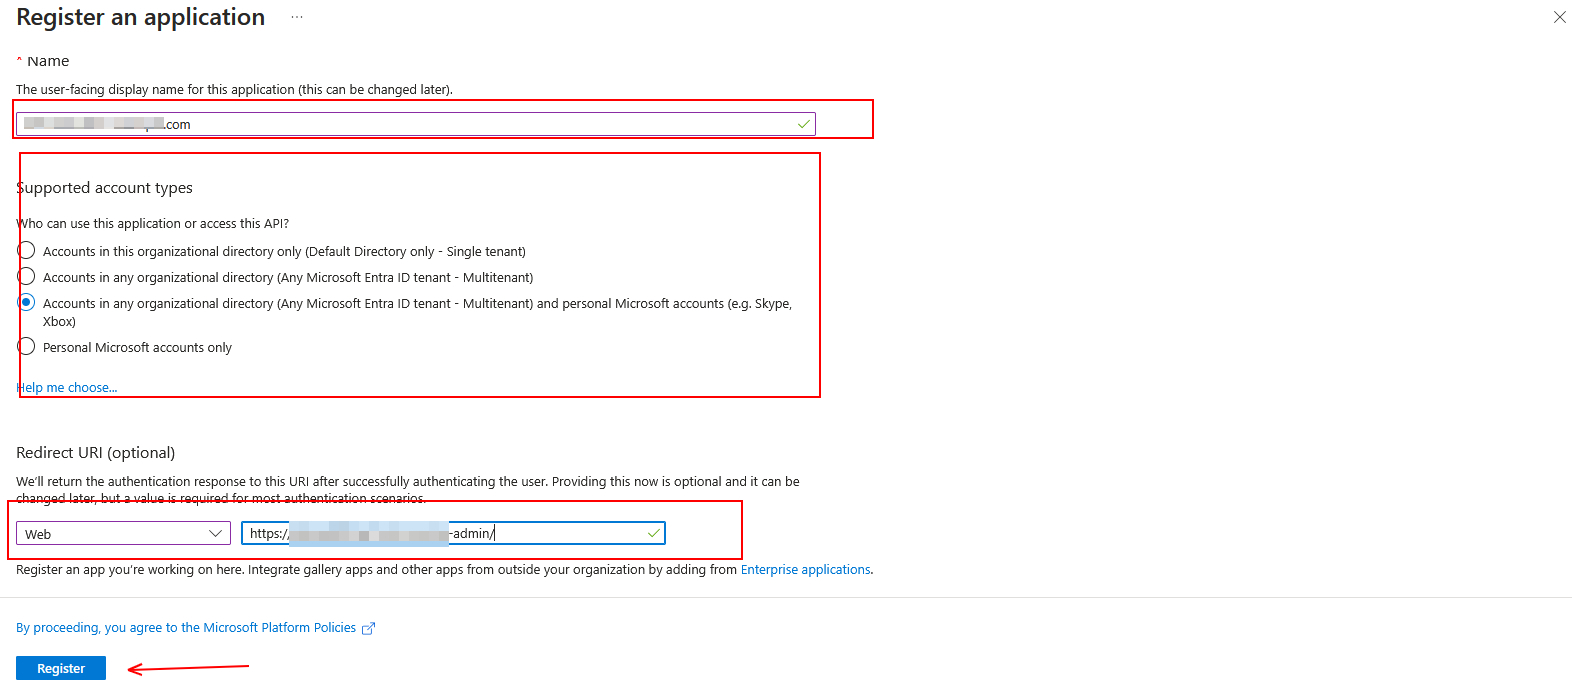
Note: After registering your application, check the Supported account types and Redirect URI under the Authentication tab. If these settings are incorrect, you may face issues authorizing WP Mail SMTP.
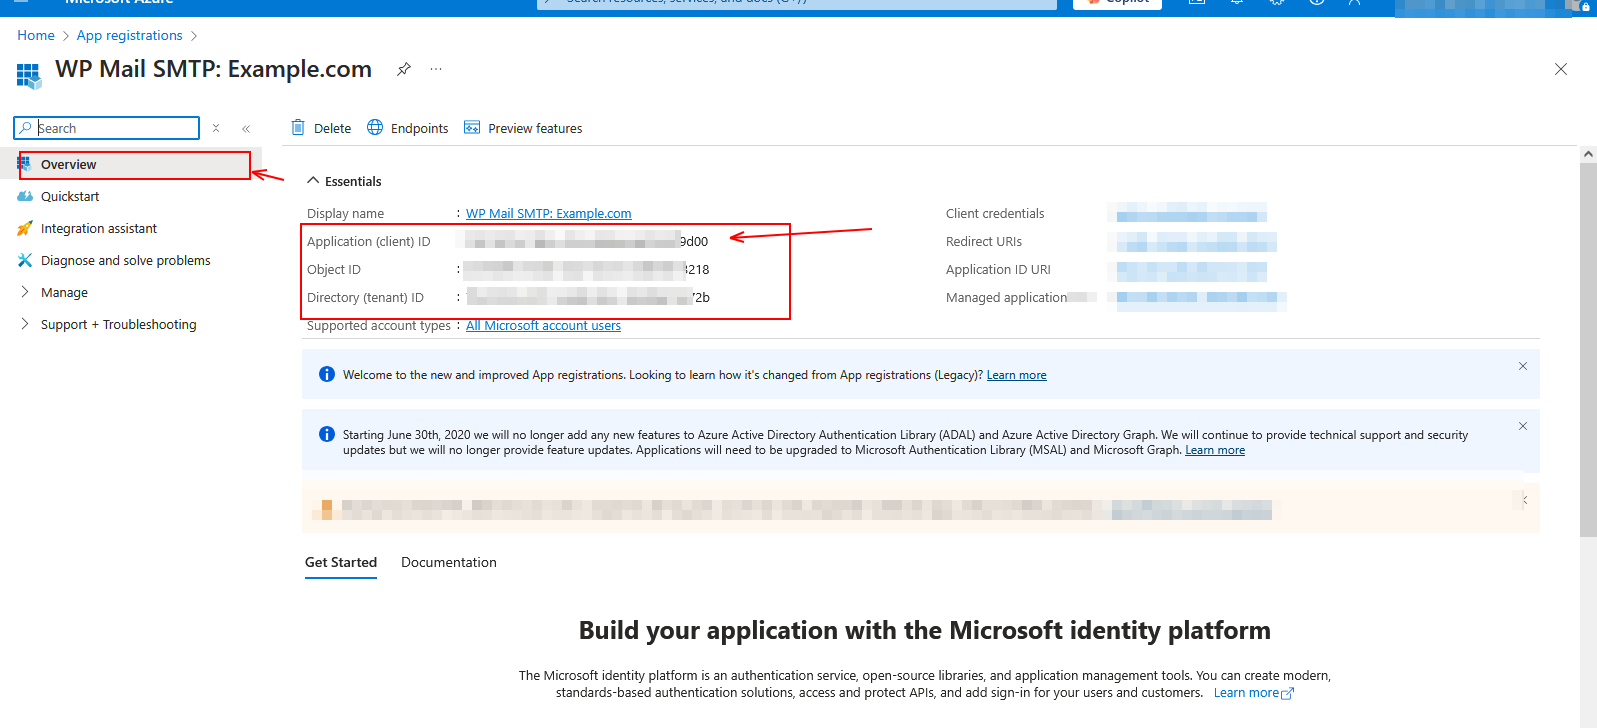
- After submitting the registration form, you’ll be taken to the Overview page. There, you’ll see your Application (client) ID—copy this value.
- You can change the Client Secret or default password from your Microsoft Azure account, or you can leave it as it is.
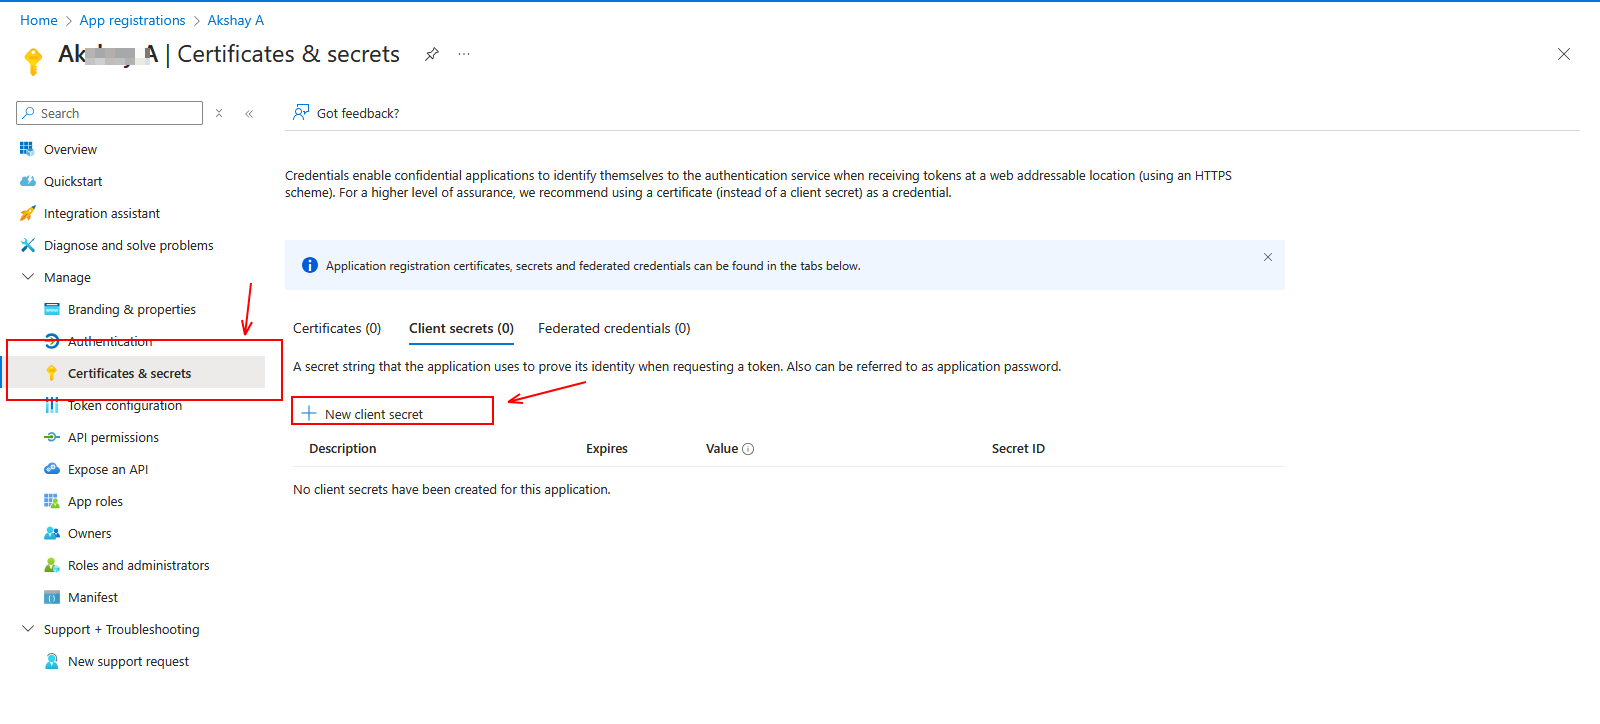
- Go to your Azure account, click on Certificates & Secrets, and then select “New client secret” to create a new password. This step is optional—if you want to keep the default password (which was your WordPress password), you can leave it as is. Otherwise, you can change it here.
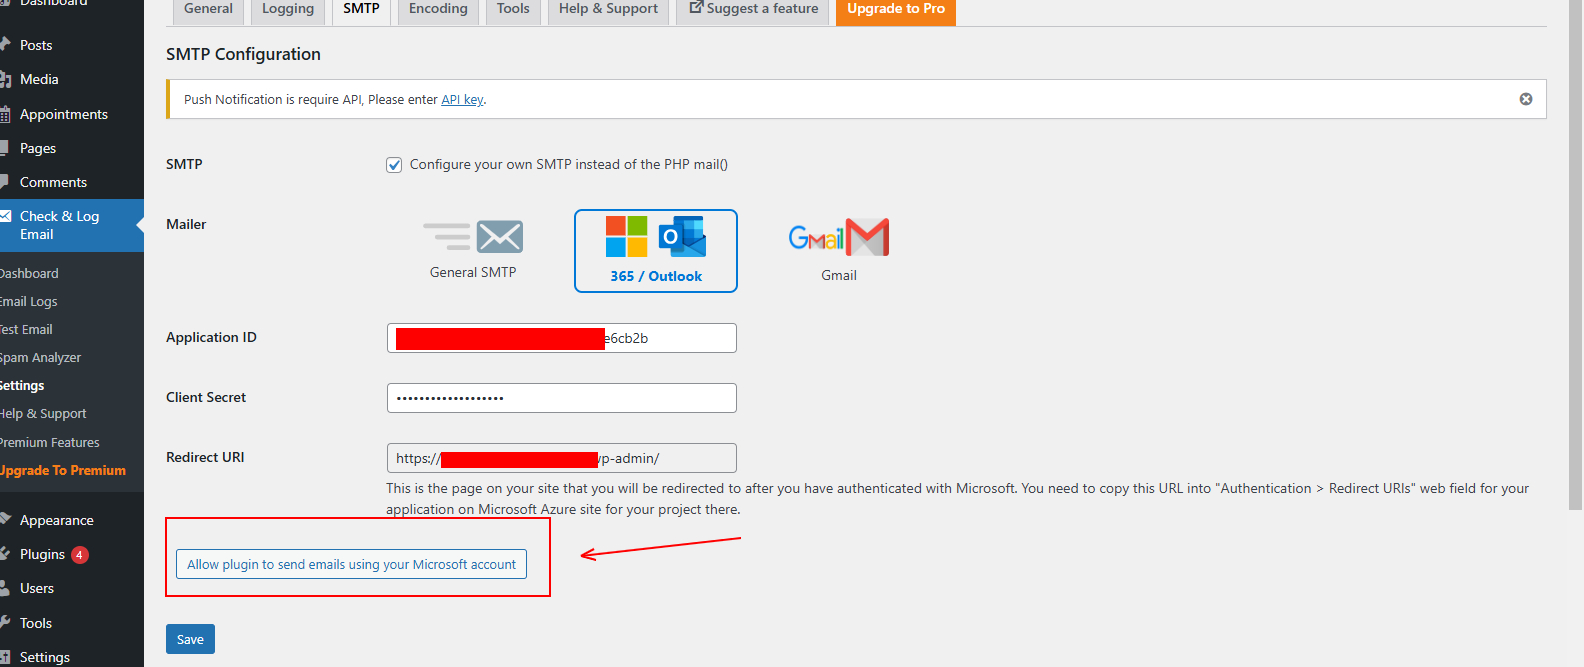
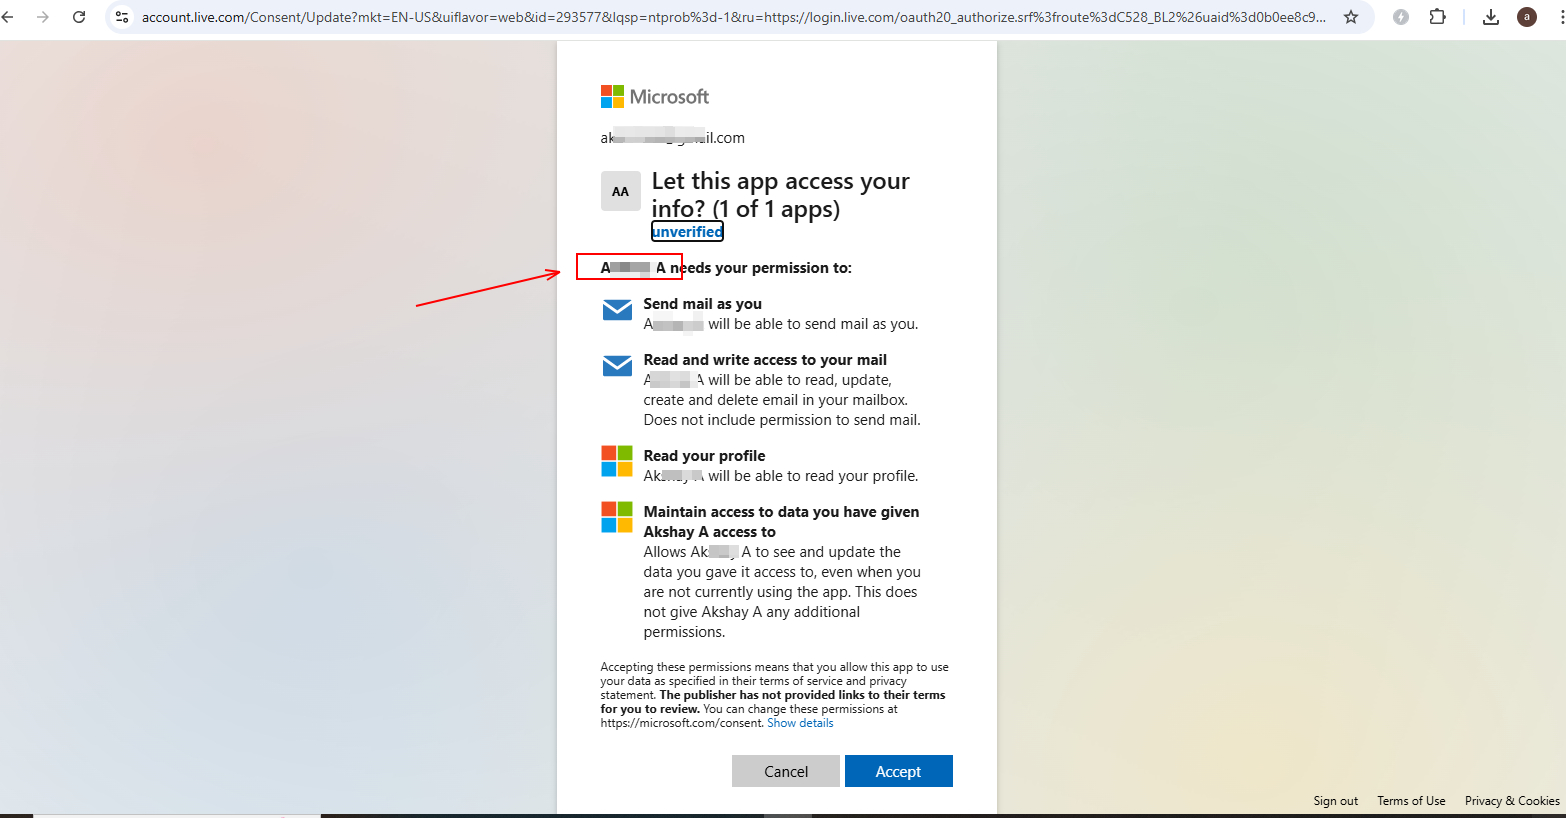
- Once you have entered the Application ID and Client Secret, click the Save button. A new option will appear in your Check Email plugin settings: “Allow plugin to send emails using your Microsoft account.” Click on this button, and you will be redirected to the Microsoft account login page.
- There, you must log in using your Microsoft account credentials.
Note: 365/Outlook Azure credentials are different from your personal Microsoft account credentials.
- Add your credentials here and confirm your account.

- Once this process is complete, you will receive a message confirming that your account is linked. This means all steps have been successfully completed. Now, go to the Test Email section and send a dummy email to verify the setup.
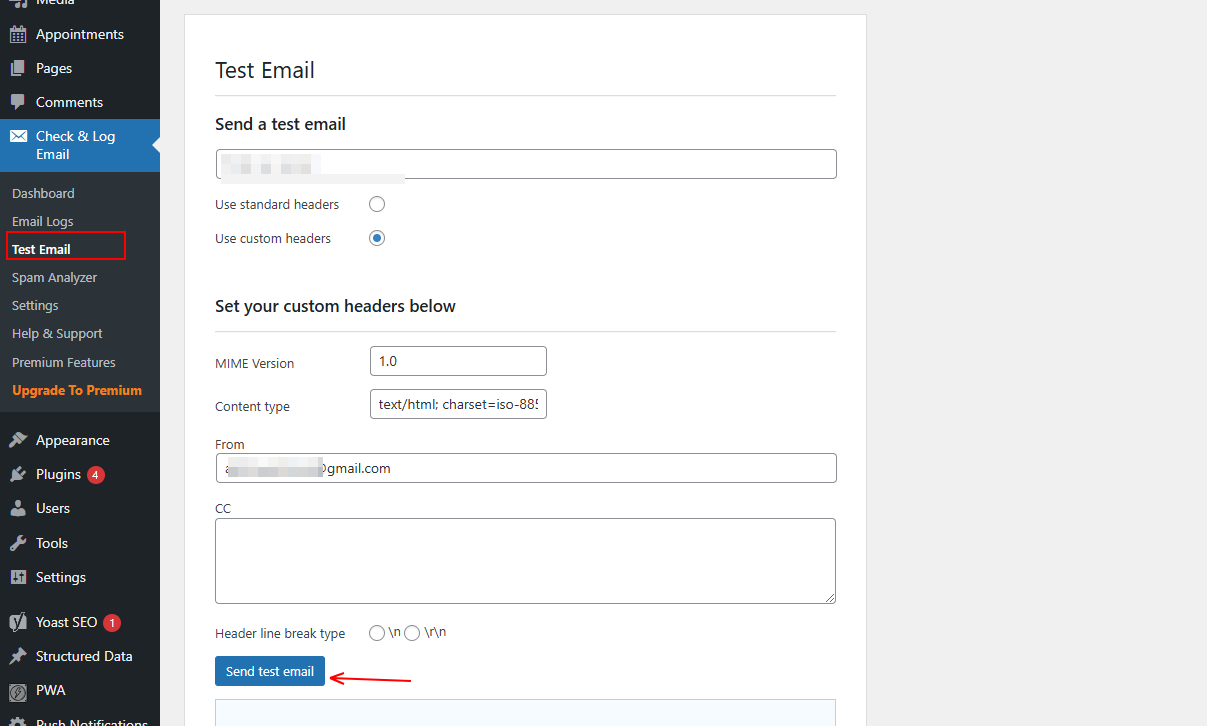
Output

- The test email will be sent to your registered email address, containing the sender details and the default test connection message. This confirms that all the steps were performed correctly.
Best Practices.
To ensure a smooth and secure email setup using Microsoft 365/Outlook SMTP in the Check & Log Email plugin, follow these best practices:
- Register the Azure Application Correctly
- When setting up your Azure App Registration, ensure you provide an accurate Application Name for easy identification.
- Choose the correct Supported Account Types based on your use case.
- Use the Correct Redirect URI
- Always copy the Redirect URI from the WP Mail SMTP settings in your WordPress site.
- Ensure the Redirect URI is correctly added in the Azure Authentication tab to avoid authorization errors.
- Authorize the Plugin Properly
- After entering the Application ID and Client Secret, click Save and follow the Microsoft login prompt to authorize access.
- Use the correct Microsoft 365/Outlook Azure credentials (different from personal Microsoft accounts).
- Test Email Functionality
- After setup, send a test email from the Check & Log Email plugin to confirm everything is working correctly.
- Check your spam folder if the test email doesn’t appear in your inbox.
- Avoid Using Personal Email for SMTP
- If possible, use a dedicated Microsoft 365 business account for better security and reliability.
- Personal Outlook accounts may have limitations on SMTP usage.
FAQ’s
- What is the Microsoft 365/Outlook SMTP feature in Check & Log Email?
- This feature allows you to send emails through Microsoft 365/Outlook SMTP directly from your WordPress website using the Check & Log Email plugin. It ensures secure and reliable email delivery.
- Where can I find the Redirect URI for setup?
- The Redirect URI is available in your WP Mail SMTP settings under the Outlook / 365 section. Copy this value and use it in your Azure app configuration.
- Do I need to change the Client Secret?
- No, changing the Client Secret is optional. You can use the default one from your WordPress setup or create a new one in the Certificates & Secrets section of your Azure account.
- What if I face issues logging into my Microsoft account?
- Ensure that you are using the correct Microsoft 365/Outlook Azure credentials, as they may be different from your personal Microsoft account credentials.
- Is this method secure for sending emails?
- Yes, using Microsoft 365/Outlook SMTP is a secure way to send emails. It uses OAuth authentication, reducing the risk of exposing your email credentials.
- Why is my test email not being sent?
- If your test email is not being delivered:
- Double-check your Application ID, Client Secret, and Redirect URI settings.
- Ensure your Microsoft account is properly linked.
- Check if SMTP settings in the plugin match your Azure configuration.
That’s it for this tutorial! If you need further assistance, please fill out the form below.